In this article, we will look at how to use Pose Detection in TensorFlow.js to classify cricket shots. In the game of cricket, there are many different shots played, such as cover drive, square cut, flick, sweep, straight drive, etc.
In this example, we will attempt to classify three cricket shots - cover drive, flick and square cut. We will utilize BlazePose TensorFlow.js model to obtain the poses from images of players playing the above shots. We will then feed these poses data to a KNN classifier to classify between these three shots.
1. Overview
The below diagram depicts the different steps involved in building this sample Javascript app for classifying cricket shots. We will look at these steps in detail. The source code for this example is present at this Github repo .
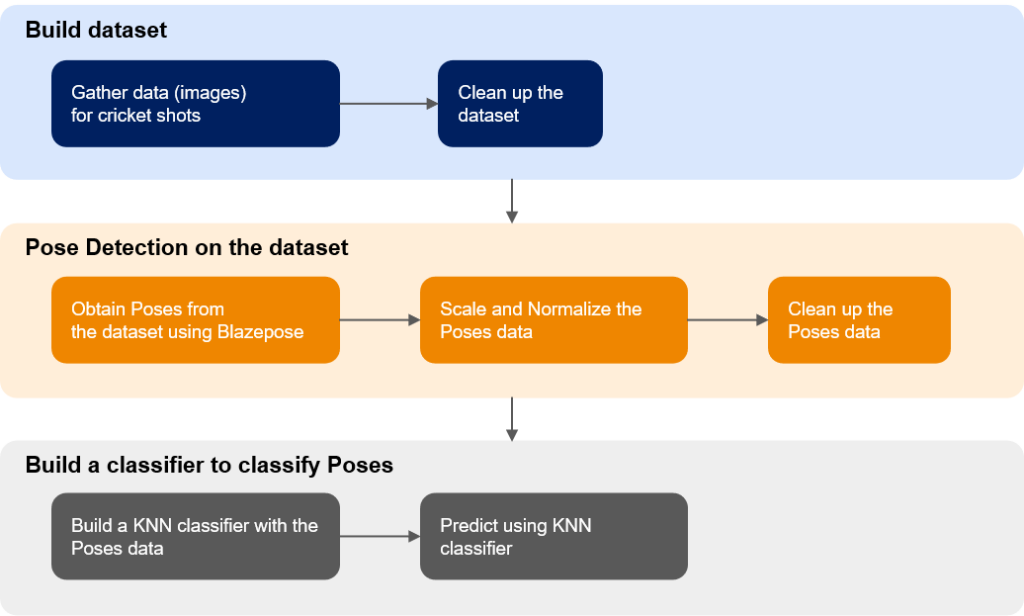
Flowchart for cricket shot classification
2. Building a custom dataset
I downloaded the images from Google for the three cricket shots that are considered for this classification. This data needed to be cleaned up as not all the images downloaded were appropriate for this classification task.
These downloaded images were of different shapes and sizes. I didn’t modify them in this step but handled it while obtaining the pose data from these images.
This dataset of images is present along with the source code in Github repo in the dataset folder.
3. Pose Detection
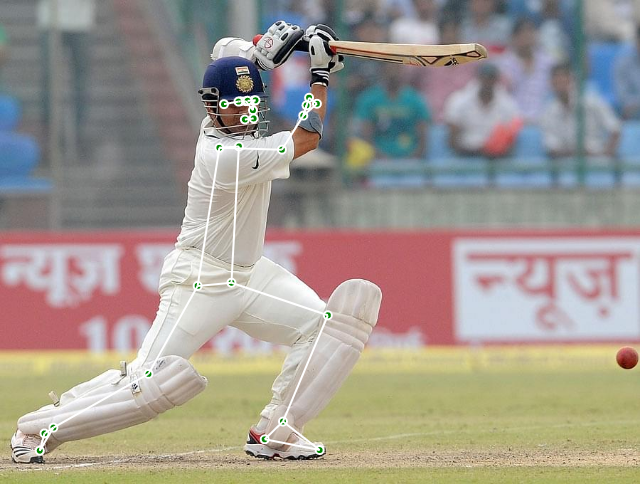
As the next step, pose detection is performed on these images to get the pose data for each of these three cricket shots - cover drive, flick and square cut.
The code for this can be found in the file - poseDetection.js . The BlazePose TensorFlow.js model is utilized to obtain the poses from these images.
3.1 Pose Detection on the dataset
Below is the code snippet of the main function getPoses() from poseDetection.js .
This function takes an array of URLs to the images on which pose detection needs to be performed. In my case, I ran the npm http-server locally with CORS enabled (http-server –cors) to serve these images. Created a simple Javascript array with the image URLs from localhost and placed the array in the data.js file which acted as input to this function.
Loop through this array of image URLs and process them one by one to obtain the poses. Load each of these images in an image element and also separately in a canvas which will be passed as input to the BlazePose pose detection model.
Also, the output image is downloaded, once the pose prediction is performed and the corresponding key points are drawn on the image in the canvas using the predicted pose data. These output images need to be manually checked to clean up images on which the poses were not predicted correctly or no poses were identified to reduce the noise on the data that will be fed to the KNN classifier later.
3.2 Scale and Normalize the pose data
Since the input images are in different sizes, we will need to normalize the predicted pose data before providing it as input to the KNN classifier.
3.2.1 Flatten the pose data
Flatten the pose data from the JSON object structure to a vector (array) containing just the x,y points for each of the key points in the pose.
Along with it calculate the xMin (minimum of all the x values this pose), yMin (minimum of all the y values in this pose) and the scaling factor (the max value between all the x and y values). These will be used in the next step to scale the images so that we can account for the different sizes (height, width) in the input images.
3.2.2 Resize and scale the pose data
Using the xMin, yMin and scaling factor that we calculate in the previous step, scale each of the x and y values.
3.2.3 Normalize the pose data
Normalize the pose data using L2 Normalization to scale the vector to have a unit norm (if you square each element in a L2 normalized vector and sum them up, the result is equal to 1).
Refer to this tensorflow blog on move mirror to understand more on the scaling and normalization steps. There is a visual representation of these steps which makes it easier to understand these steps.
3.2.4 Putting it together
Perform the above three steps - flatten the pose data to vector, resize and scale the points to account for different shapes of images and finally normalize the vector - for each of the pose data obtained for each image in the dataset.
Add these normalized pose vectors to an array and return the array. These pose vectors for each image are logged to the browser console. Save the console log once the poses are identified for all images.
These pose vectors are then put in separate Javascript arrays in data.js file, corresponding to each category of cricket shot that we are attempting to classify.
3.3 Clean up the pose data
By manually looking at the output images which contain the pose keypoints drawn, we can delete pose vectors for those images for which pose detection was not performed correctly to reduce the noise in the data.
4. KNN Classifier
As the final step, we will build a KNN classifier to perform the classification between the three cricket shots using the pose data obtained in the above step.
4.1 Build the KNN Classifier
Place the array of pose vectors for each of the three categories in the data.js file.
Use the KNN classifier from the TensorFlow.js models for this task. The code for building the KNN classifier can be found in the classifyPoses.js file.
The pose vectors are converted to 1d tensors and added as an example to the classifier for all three categories of the cricket shots.
4.2 Predict the shot on test data
The UI provides the facility for the user to upload an image to test if the classifier classifies the shot correctly. Once the image is uploaded and the “Predict the cricket shot” button is clicked, the classifyCricketShots() function is invoked.
The classifyCricketShots() function determines the pose in the image and the pose data is resized, scaled and normalized before passing to the classifier to classify the pose.
The classification output is then displayed on the UI.
That’s it on the classification of cricket shots using pose detection. Happy Learning !
5. References
- TensorFlow blog on Move Mirror
- Github repo of Move Mirror project
- PoseNet similarity algorithm page
- Pose Detection TensorFlow.js Github repo
- Mediapipe BlazePose blog on Pose Classification
- TensorFlow blog on Mediapipe BlazePose Pose Detection
- Google AI blog on Pose Detection with Mediapipe Blazepose