Human Pose Detection is fascinating as there are endless use cases and opens up the possibility for various kinds of applications which were earlier either difficult to build or required specialized hardware and software.
In this article, I will walk you through the steps required to build a simple JavaScript app that detects human poses using Pose Detection API in TensorFlow.js utilizing the Mediapipe BlazePose model.
1. Overview
Pose Detection API in TensorFlow.js provides a common interface to work with three different models - MoveNet, BlazePose and PoseNet. We will be looking at how to utilize the Mediapipe BlazePose model and build an app that detects human poses in a video in real time.
BlazePose is a single-person model and will return only pose at any point in time. It provides 3 types of models -
- lite - smallest model but less accurate
- heavy - largest model with high accuracy
- full - middle ground between performance and accuracy
Let’s dive into the implementation details.
2. Implementation
We will build a basic ES6 JavaScript app using npm . The source code for this app is present in this Github repo .
2.1 Install the dependencies
To use the BlazePose model, we will first need to select a runtime backend from the two options - Mediapipe and TensorFlow.js. Please check this TensorFlow.js model’s Pose Detection API Readme to understand the advantages of each runtime and their performance analysis.
Here, we will be making use of the TensorFlow.js runtime backend for the BlazePose model.
    npm i @tensorflow-models/pose-detection
    npm i @tensorflow/tfjs-backend-webgl
    npm i @tensorflow/tfjs-converter
    npm i @tensorflow/tfjs-core
2.2 Build the HTML file
Create a new HTML file named index.html . This file will hold the video and canvas element required for this sample application to detect poses on live video using webcam in the browser.
2.3 Build the JavaScript file
Create a new JavaScript file named index.js .
2.3.1 Import the required libraries
Import the below required libraries for pose detection using BlazePose.
import * as poseDetection from '@tensorflow-models/pose-detection';
import '@tensorflow/tfjs-backend-webgl';
2.3.2 Create a detector
Invoke the poseDetection.createDetector() method and pass the model and detector configuration object as input to load and initialize the model.
The poseDetection.SupportedModels enum list consists of three model names - MoveNet, BlazePose and PoseNet. In this example we are selecting the BlazePose model using poseDetection.SupportedModels.BlazePose.
In the detector config, we specify the
- runtime as “tfjs”. The other option is “mediapipe”
- modelType as “full”. The other options are “lite” and “heavy”
Please refer to the BlazePose TF.js model’s Readme page to understand the complete list of available configuration options.
async function createDetector() {
    model = poseDetection.SupportedModels.BlazePose;
    const detectorConfig = {
        runtime: "tfjs",
        modelType: "full"
    };
    detector = await poseDetection.createDetector(model, detectorConfig);
}
2.3.3 Enable webcam and activate the video
Enable the webcam using navigator.mediaDevices.getUserMedia method and assign the video stream as the source to the video element.
async function activateVideo() {
    if(navigator.mediaDevices.getUserMedia) {
        navigator.mediaDevices.getUserMedia({'video': {
            width: '640',
            height: '480'
        }}).then(stream => {
                video.srcObject = stream;
            })
            .catch(e => {
                console.log("Error occurred while getting the video stream");
            });
    }
    ...
}
Define a callback function to the video.onloadedmetadata event to set the width and height of video and canvas elements. Also, invoke canvasContext.translate and canvasContext.scale inorder to flip the image horizontally in canvas as the image from webcam camera is a mirrored one.
Finally add an event listener to the loadeddata event of the video element and pass predictPoses() function as a callback to it.
async function activateVideo() {
    ...

    video.onloadedmetadata = () => {
        const videoWidth = video.videoWidth;
        const videoHeight = video.videoHeight;

        video.width = videoWidth;
        video.height = videoHeight;
        canvas.width = videoWidth;
        canvas.height = videoHeight;

        // Because the image from camera is mirrored, need to flip horizontally.
        ctx.translate(videoWidth, 0);
        ctx.scale(-1, 1);
    };

    video.addEventListener("loadeddata", predictPoses);
}
2.3.4 Predict the poses
Invoke detector.estimatePoses() method to predict the poses in the image / video. In this case, we pass in the video element so that we can identify the poses on every frame of the video. This method, apart from the video / image input, also takes in a configuration object as input. We specify flipHorizontal as false as the images are from video frames.
The poses data structure consists of the following
- poses array: returns an array of pose objects for each individual identified in the image. Although in this case, the poses array contains a max of one pose object as BlazePose model is a single-person model.
- pose object: the pose object contains
- a score - which is the model’s confidence on the identified pose
- an array of key points - In this case, there are 33 key points and each key point contains the (x, y, z) coordinates, a confidence score for the keypoint and the name of the keypoint.
- an array of 3D keypoints - each keypoint containing the name, confidence score and the (x, y, z) coordinates. These points represent the absolute distance in meters in a 2 x 2 x 2 meter cubic space. The range for each axis goes from -1 to 1 (therefore 2m total delta). The z is always perpendicular to the xy plane that passes the center of the hip, so the coordinate for the hip center is (0, 0, 0).
Below is a sample data returned by the detector.estimatePoses() method.
[
  {
    "score": 0.9998754262924194,
    "keypoints": [
        {
            "x": 440.8597549794458,
            "y": 338.8437966387325,
            "z": -707406.0323943475,
            "score": 0.9975403196580902,
            "name": "nose"
        },
        {
            "x": 460.8565448807353,
            "y": 303.9807734086734,
            "z": -684695.3132532244,
            "score": 0.9976131545116044,
            "name": "left_eye_inner"
        },
        ….
    ],
    "keypoints3D": [
        {
            "x": 0.061644310450861946,
            "y": -0.5461446649784755,
            "z": -0.3293023805264617,
            "score": 0.997927365221679,
            "name": "nose"
        },
        {
            "x": 0.08501885607906065,
            "y": -0.5858327811240523,
            "z": -0.3193352212093456,
            "score": 0.9978010976964026,
            "name": "left_eye_inner"
        },
        …
    ]
  }
]
async function predictPoses() {
    let poses = null;
    if (detector != null) {
        try {
            poses = await detector.estimatePoses(video, {
                flipHorizontal: false
            });
        } catch (error) {
            detector.dispose();
            detector = null;
            alert(error);
        }
    }
    ...
}
Draw every frame of the video onto the canvas using the ctx.drawImage() method.
Loop through the array of poses returned by the detector.estimatePoses() method and draw the key points and skeleton on top of the image in live video.
Finally invoke the window.requestAnimationFrame() and pass predictPoses() function to it, so that the predictPoses() function gets invoked repeatedly to process every frame of the video.
async function predictPoses() {
    ...
    ctx.drawImage(video, 0, 0, video.videoWidth, video.videoHeight);

    if (poses && poses.length > 0) {
        for (const pose of poses) {
            if (pose.keypoints != null) {
                drawKeypoints(pose.keypoints);
                drawSkeleton(pose.keypoints);
            }
        }
    }

    window.requestAnimationFrame(predictPoses);
}
2.3.5 Draw the key points
Draw the key points on the video frame image by looping through the “keypoints” array within the pose object. For each of these key points, draw a circle at that coordinate if the confidence score is above 0.6.
function drawKeypoints(keypoints) {
    ctx.fillStyle = 'Green';
    ctx.strokeStyle = 'White';
    ctx.lineWidth = 2;
    for(let i=0; i<keypoints.length; i++) {
        drawKeypoint(keypoints[i]);
    }
}

function drawKeypoint(keypoint) {
    const radius = 4;
    if (keypoint.score >= scoreThreshold) {
      const circle = new Path2D();
      circle.arc(keypoint.x, keypoint.y, radius, 0, 2 * Math.PI);
      ctx.fill(circle);
      ctx.stroke(circle);
    }
}
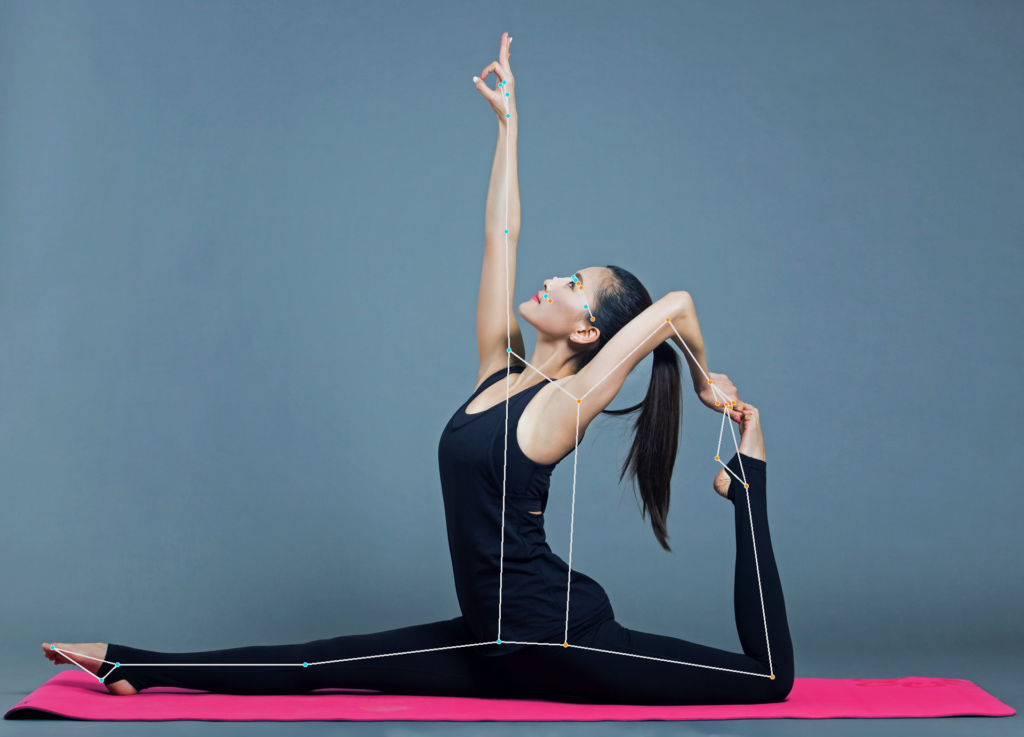
2.3.6 Draw the skeleton
Invoke the poseDetection.util.getAdjacentPairs(model) utility function to get a list of adjacent key points. Draw lines between those adjacent key points to draw the skeleton on the human body image.
function drawSkeleton(keypoints) {
    const color = "#fff";
    ctx.fillStyle = color;
    ctx.strokeStyle = color;
    ctx.lineWidth = 2;

    poseDetection.util.getAdjacentPairs(model)
        .forEach(([i, j]) => {
            const kp1 = keypoints[i];
            const kp2 = keypoints[j];
            if (kp1.score >= scoreThreshold && kp2.score >= scoreThreshold) {
                ctx.beginPath();
                ctx.moveTo(kp1.x, kp1.y);
                ctx.lineTo(kp2.x, kp2.y);
                ctx.stroke();
            }
    });
}
3. Run the app
To run this app, first clone the Github repo for this app and then execute the following commands to run the project. This should open up a browser pointing to localhost.
npm install
npm run watch - This command should open the app in browser
That’s it for this sample app. Happy Learning!
4. References
- Github repo of the pose detection api in TensorFlow.js models
- Readme page of the BlazePose TF.js model
- Demo app of the Pose Detection api
- Pose Detection article from Google AI blog
- Pose Detection article from Mediapipe