In this article, we will be building a simple app to detect objects on an image using TensorFlow.js library. To do this we will make use of the TensorFlow.js pre-trained “coco-ssd ” model.
In this example, user will browse and select an image file to identify objects present in that image. This selected image file is only handled on the client side within the browser and not uploaded to any server.
We will be building the following three files and placing them in the same directory.
1. Build the HTML file
Create a new HTML file named index.html and add the below code. It contains mainly a input element to browse and select an image file, a div element which wraps an image element to display the selected image, and a button to execute the model to detect objects on the image.
2. Build the Javascript file
Firstly let’s get a handle on all the elements from the page that we would manipulate.
Let’s load the coco-ssd model object which will be made available from the coco-ssd script that we added to the HTML page earlier.
Let’s now add some action when the image file is selected by the user as input. In the below onchange event of file element, we perform the following actions -
- Clear the image container div element, to remove the boxes that we drew on the identified objects in the previous image.
- Display the current selected image file by the user
- Also, enable the ‘Identify Objects’ button
Finally, let’s add code to identify the objects in the image using the coco-ssd model. We will add an event listener to the ‘Identify Objects’ button’s click event.
In the above code, we first check if the coco-ssd model is loaded properly. Invoke the model.detect() method by passing it the image element where the user selected image is loaded.
The model.detect() method can take the following inputs.
- “img” - image data
- “maxNumBoxes” - Maximum number of bounding boxes to be identified on the image. Default is 20.
- “minScore” - Minimum score to trust the detected object. The value ranges between 0 and 1. Default is 0.5.
model.detect(
  img: tf.Tensor3D | ImageData | HTMLImageElement |
      HTMLCanvasElement | HTMLVideoElement, maxNumBoxes: number, minScore: number
)
This method returns an array of objects, each object containing the following
- “bbox” - An array containing the bounding box coordinates - [x, y, width, height]
- “class” - The object class that is identified in the image
- “score” - The model’s confidence of the identified object
Sample output is provided below
[
 {
  bbox: [1.3658106327056885, 44.03962084650993, 66.01275503635406, 224.98308411240578],
  class: "person",
  score: 0.8865377306938171
 }, {
  bbox: [242.86986887454987, 29.381974071264267, 84.23362672328949, 292.8159601986408],
  class: "person",
  score: 0.8529592156410217
 }
]
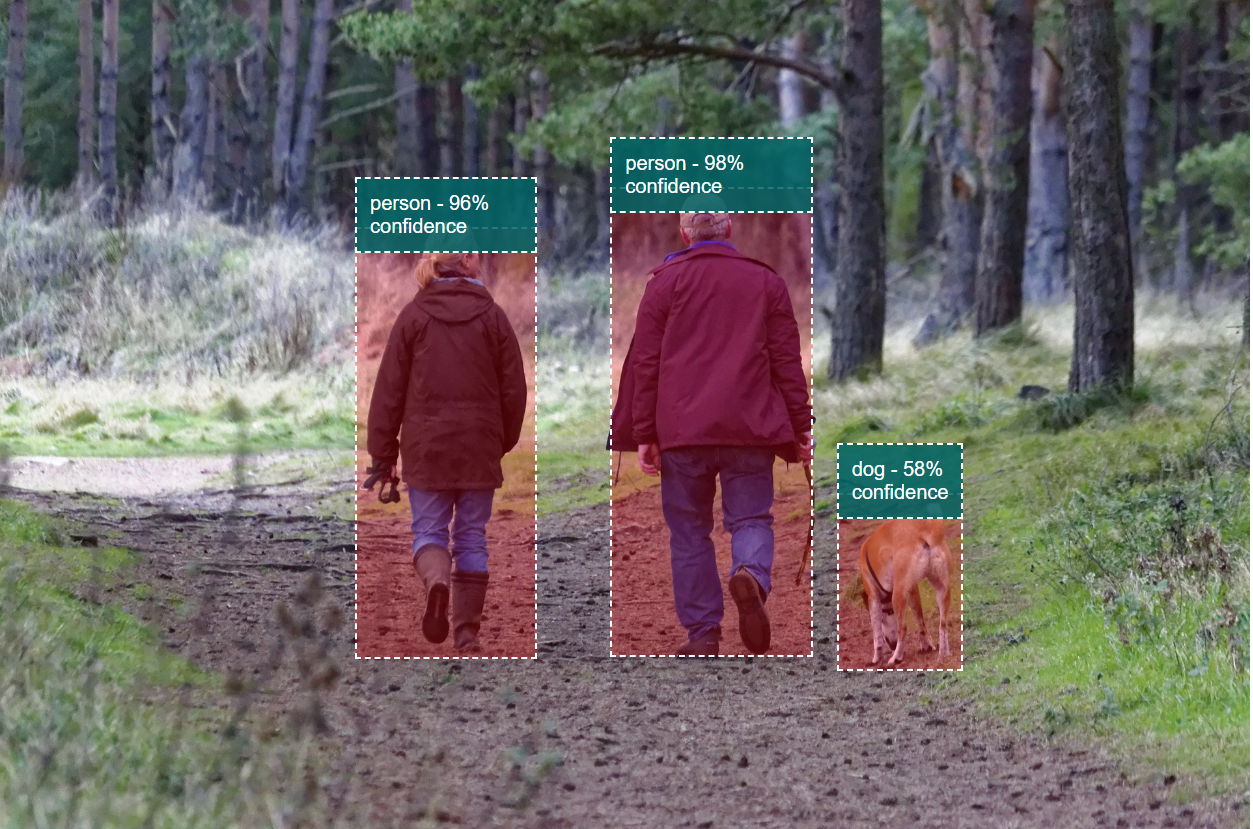
Finally, we loop through the array returned by the model.detect() method and draw the bounding boxes on each of the identified objects. A HTML Div element is created for each bounding box based on the co-ordinates returned and a HTML Paragraph element to create a header to display the class and score of the identified object.
These elements are appended as child elements to the “imgDiv” element which contains the “img” element.
3. Add the stylesheet
Create a new style.css file and add the below styles. This file contains the styles for the bounding box and the bounding box header along with the style for the Div elements which contains the image element.
To run the example, open the index.html in a browser, choose an image file and click the “Identify Objects” button.
Download the source code for this app from Github. This code and demo is also available at Glitch.com .
References
- GitHub page of coco-ssd model part of TensorFlow.JS pre-trained models.
- CodeLab from Google on object detection by Jason Mayes.