As most of us are working from home now, it has become a normal thing to set a custom background for our video calls through popular apps such as Zoom or Microsoft Teams. In this article, we will look at how to change the background for live webcam videos using TensorFlow.js .
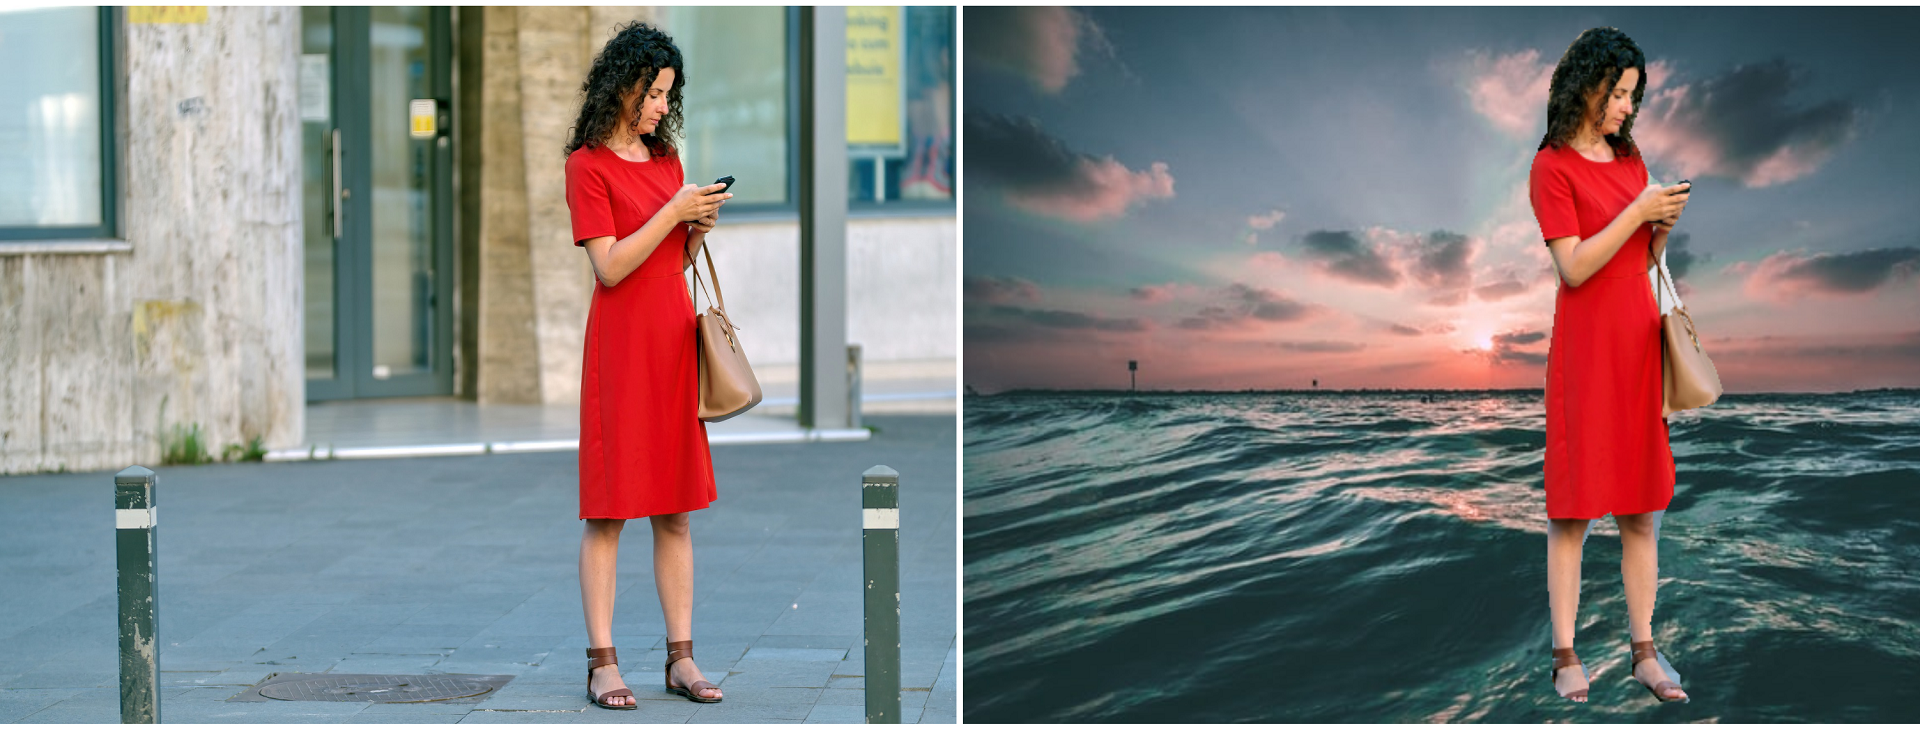
Person Segmentation in action
We will be making use of the BodyPix model which is a pre-trained TensorFlow.js model. This model performs image segmentation - specifically person and human body parts segmentation.
This model allows to segment a given image or video frame into pixels to
- classify if each of those pixels are part of a person or not
- classify pixels that belong to different human body parts
The source code for the app that we will be building is in this Github repo .
1. Overview
We will be building a small app which allows the user to set a custom background for a live video using a webcam in the browser. Let’s dive into the details.
2. Implementation
We will build two files for this app
- a HTML file to display the live video and the updated video with the modified background
- a Javascript file to contain the code for changing the background of the video
2.1 Build the HTML file
Let’s create a new HTML file named “change-background-in-video.html ”.
Add the required libraries
Include the TensorFlow.js and Body-Pix libraries using the scripts tag.
Or you can also install these packages using npm as well.
Add the HTML elements
Let’s add a video element to display the live webcam video and a canvas element to display the same video but updated with a different background using the body-pix model.
Add the JavaScript file
Add the JavaScript file which will hold the functionality for this app.
Add the css styles
Add the css properties for the canvas element where we display the webcam video with a custom background. We are hardcoding the background image for the canvas on top of which the webcam video will be displayed.
That’s it with the HTML file. Now, let’s dive into the details of the JavaScript file where all the action resides.
2.2 Build the JavaScript file
Let’s create a new JavaScript file named “change-background-in-video-script.js ”.
Declare the variables
Declare the variables that hold the references to the HTML elements. In addition, we will be creating an in-memory canvas element which will temporarily hold each frame of the video and will be passed to the body-pix model for person segmentation. This in-memory canvas element is not added to the DOM, hence it will not be displayed on the screen.
Load the body-pix model
Load the body-pix model that will be used for person segmentation on each frame of the video.
Activate the webcam
Next, we will write a main() function which will be the starting point for this app. In this function, activate the webcam and display the video in the video element by making use of the navigator.mediaDevices.getUserMedia() method. We pass in the constraint to just display the video with no audio.
Let’s make use of the onloadedmetadata property of the video element and set both the canvas element’s width and height to that of the video element. This is important as we are going to extract the person image from the video element and display it on the canvas element, so they need to match in size.
Finally, add an event listener for the video element’s “loadeddata ” event and pass a callback function “_segmentPersons()_” to it.
Perform Person Segmentation using Body-Pix model
Now, let’s grab each frame of the video and provide that as an input to the Body-Pix to obtain the person segmentation output which basically segments the frame image’s pixels into those that contain a person and those that don’t.
In the segmentPersons() function, first draw the frame image from video onto the temporary in-memory canvas. Pass this frame image from the temporary canvas as input to the Body-Pix model.segmentPerson() function. Along with the canvas element, we also pass a configuration object, in which we set the following configs.
- segmentationThreshold - The score (between 0 and 1) assigned to each pixel that indicates the confidence of the model that the pixel belongs to a person’s body. Default is 0.7. Setting a higher value will result in a much closer crop of the person’s body but could also result in a few false negatives - excluding a pixel that is part of a person’s body.
- internalResolution - The internal resolution percentage that the input is resized to before inference. Allowed values are low, medium, high and full which maps to 0.25, 0.5, 0.75 and 1.0 respectively. A larger value will increase the accuracy of the model while compromising on the speed of the inference.
Invoke the processSegmentation() function by passing the model’s output where we will make use of the pixel wise segmentation array to grab the pixels that belong to a person.
Using the window.requestAnimationFrame() method, invoke the segmentPersons() function repeatedly, so that each frame of the video can be processed to get the body segmentation output on that frame.
Process the segmentation result and redraw the image with a different background
The idea here is to make use of the Body-Pix model’s output to identify all the pixels that do not belong to a person and make them transparent. Then take this image and draw it on the canvas element that we defined in the HTML file. This will display the custom background image that we have set for the canvas and the person on the foreground.
The Body-Pix model’s output object - segmentation - contains a data attribute, which is an array of 0s and 1s for every pixel in the image, where 1 denotes that the pixel is part of a person and 0 denotes that the pixel is not part of the person. Please refer below to the sample output object’s structure.
{
  width: 640,
  height: 480,
  data: Uint8Array(307200) [0, 0, 0, 0, 0, 0, 0, 0, 0, 0, 0, 0, 0, 1, 0, 0, 1, …],
  allPoses: [{"score": 0.4, "keypoints": […]}, …]
}
Get the video frame image’s pixel data from the in-memory temporary canvas using getImageData() function on the HTML canvas context. For every pixel in the ImageData object returned by getImageData() function, there are 4 values - RGBA values
R - The color red (from 0-255)
G - The color green (from 0-255)
B - The color blue (from 0-255)
A - The alpha channel (from 0-255; 0 is transparent and 255 is fully visible)
This information is contained in the ImageData.data array. We will loop through the ImageData.data array and at every pixel, we will look up the segmentation.data array to check if this pixel belongs to a person’s body. If it doesn’t belong then we will set the “alpha” channel of the pixel to 0, making that pixel transparent.
At the end of this loop, we will get an image where all the pixels that don’t belong to a person are made transparent and only the person is visible. This image is then drawn on the canvas using the putImageData() function. This will make the person’s image appear in front of the custom background that we set for the canvas.
That’s it for changing the background of a live video. Please play with the example by downloading the source code from Github .
Leave a comment below, if you have any questions or feedback. Happy Learning!
3. References
- Github repo of the Body-Pix model.
- getImageData() and putImageData() function from W3 schools.
- Manipulating video using canvas article .