This article is the continuation of the previous article on MediaPipe Face Mesh model in TensorFlow.js, where we looked at the basic usage of this model. Here, we will look at how to connect the 468 3D facial landmark predictions as multiple triangles to create a triangle mesh of the face.
1. Triangle Mesh
To create a triangle mesh from the 468 [x,y,z] coordinates, we will need to identify which are the set of points that need to be connected to form triangles. Luckily Google has provided those indexes for us to draw the triangle mesh. It is present in the triangulation.js file located in the Github repo of the pre-trained model.
The triangulation.js file contains a flat 1D array of indexes, each pointing to one of the indexes in the array that holds the 468 3D points. Each consecutive set of three indexes, starting with the 0th index, will be used to form a triangle.
1.1 Build a HTML file
Create a new HTML file named index.html and add the below code.
The video element is kept hidden and only the canvas is displayed on the screen. We load a bunch of JavaScript files including the face mesh model, its dependencies and the custom script file of this example.
Let’s download the triangulation.js file from the TensorFlow.js pre-trained models github repo and place it locally. Include this script as one of the scripts to be loaded in this HTML page.
1.2 Build the index.js file
Create a new file named index.js file and add the below code. The base code for setting up the camera, canvas and loading the model are the same as in the previous article . So, I will skip going into the details of it and let’s walk through the renderPrediction() function in detail, in this article.
1.2.1 Render the prediction
Let’s create a function named renderPrediction(). In this function, firstly, we will invoke the model.estimateFaces() function to get the predicted face landmark positions. The estimateFaces() function accepts a config object as input in which we will set the video stream as input.
Display the current frame from the video stream on the canvas using the ctx.drawImage() function.
Invoke the connectKeypointsToDrawTriange() function to create a triangle mesh of the face by connecting the predicted facial landmarks. We will look at building this function in the next section.
Let’s call the renderPrediction() function in a loop using window.requestAnimationFrame() function to predict the facial landmarks on every frame of the video stream.
1.2.2 Draw the triangle mesh of the face
Create a function named connectKeypointsToDrawTriange() which accepts the Face Mesh model’s predictions object as input.
The predictions object is an array, and in our case, it will contain only a single prediction at the max, as we set maxFaces parameter to 1, while we loaded the model. Loop through the predictions array and retrieve the facial landmarks from the prediction object using the prediction.scaledMesh attribute.
prediction.scaledMesh provides an array containing 468 3D facial landmark positions, scaled appropriately to the width and height of the input video stream. Each of these landmark positions is an array containing the x, y and z values for each point.
Loop through the array of indexes present in the triangulation.js file and for each iteration retrieve three consecutive values (indexes) from the array. Use these index positions to retrieve the three corresponding points (x, y) from the keypoints array obtained from the prediction.scaledMesh attribute. Connect these three points to create a triangle on a specific part of the face.
Begin a path using the canvas context object and move to the starting point using the ctx.moveTo() function. Add a straight line to the second and third points using the ctx.lineTo() function. Add the last line between the first and last points using the ctx.closePath() function.
Finally invoke the ctx.stroke() to draw the lines outlining the above path to create the triangle.
The output should look something like below.
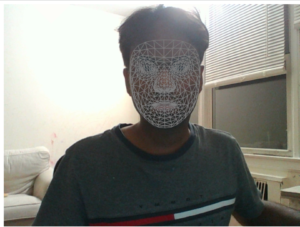
Triangle Mesh of the face
You can fill all these triangles with a color to display it like a face mask. To do that, add the below two lines of code and comment the existing lines at line 2 and 15 respectively.
//ctx.strokeStyle = "grey";
ctx.fillStyle = "grey";

....

//ctx.stroke();
ctx.fill();
The output should look something like below.
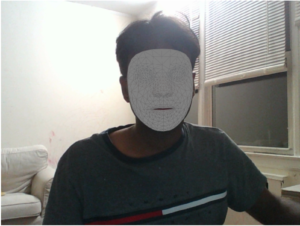
Face Mesh turned to a mask
You can go a step further and fill each of the triangles with a random color to create a colorful mesh of the face. Let’s create a function getRandomColor() to return a random color, each time it is invoked.
Invoke this function at line 11 of the above code just before invoking the ctx.beginPath() function, as shown below.
ctx.fillStyle = getRandomColor();
The output should look something like below.
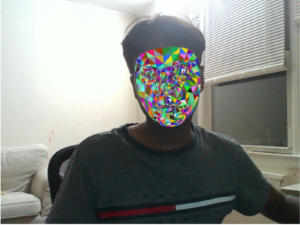
Face mesh colored
2. Target specific part of a face
The Face Mesh model’s output prediction object consists of additional attributes within the prediction.annotations attribute that allows us to target and track a specific part of the face, for example lips, eyes, nose, etc.
2.1 Outline of the face
The attribute prediction.annotations.silhouette in the model’s prediction object provides the points that outline the face. Let’s create a function named drawFaceOutline() to display these points on the canvas.
Invoke the drawFaceOutline() function from the renderPrediction() function and comment the existing connectKeypointsToDrawTriange() function invocation within it.
2.2 Outline of the eye
There are a list of 14 attributes specific to the eye within the prediction.annotations attributes that provides an array of points that can be used together to locate and track the outline of the eye in the face. Let’s create a function named drawEyesOutline() to display these points on the canvas.
Invoke the drawEyesOutline() function from the renderPrediction() function and comment the existing connectKeypointsToDrawTriange() and _drawFaceOutline_() function invocations within it.
2.3 More on the annotations attribute
Below is the list of attributes within the prediction.annotations attributes that provides points specific to a face part.
- prediction.annotations.silhouette
- prediction.annotations.lipsUpperOuter
- prediction.annotations.lipsLowerOuter
- prediction.annotations.lipsUpperInner
- prediction.annotations.lipsLowerInner
- prediction.annotations.rightEyeUpper0
- prediction.annotations.rightEyeLower0
- prediction.annotations.rightEyeUpper1
- prediction.annotations.rightEyeLower1
- prediction.annotations.rightEyeUpper2
- prediction.annotations.rightEyeLower2
- prediction.annotations.rightEyeLower3
- prediction.annotations.rightEyebrowUpper
- prediction.annotations.rightEyebrowLower
- prediction.annotations.leftEyeUpper0
- prediction.annotations.leftEyeLower0
- prediction.annotations.leftEyeUpper1
- prediction.annotations.leftEyeLower1
- prediction.annotations.leftEyeUpper2
- prediction.annotations.leftEyeLower2
- prediction.annotations.leftEyeLower3
- prediction.annotations.leftEyebrowUpper
- prediction.annotations.leftEyebrowLower
The file keypoints.ts contains the location where each of the 468 predicted points corresponds to on the face. This file provides a list of named arrays corresponding to a face location which contains the index positions within the prediction.scaledMesh array that contains the 468 points.
The source code for this article is present in this Github repo . Happy learning!
3. References
- Face Landmarks Detection package in TensorFlow.js pre-trained model’s Github repo.
- MediaPipe blog on Face Mesh model .
- MediaPipe blog on Iris model .
- Google AI Blog: Real-Time AR Self-Expression with Machine Learning
- TensorFlow Blog: Face and hand tracking in the browser with MediaPipe and TensorFlow.js